Seed Starting 101
Q. This week's question was going to be attributed to Erica in Wheatfield NY, "a small town between Niagara Falls and Buffalo", who wanted to know if she really had to bleach her seed starting containers. But Erica learned the answer (a loud and certain "No!") when our Peerless Producer Tavia picked her for a phone call that aired two weeks ago, so she can't ask the question here. Sorry, Erica!
A. OK; all seriousness aside, let's walk through the task of seed starting:
• Containers: Forget old egg cartons, yogurt cups and the like. Use the six-pack plastic containers (or four-pack or whatever) that garden centers and nurseries use. They're the right height and shape and have excellent drainage. Just rinse old ones out with soap and water; no need for dangerous chemicals that were once used as a deadly World War I trench gas.
• "Medium". Not the Fortune Teller who predicts when your starts will die, 'medium' is the term we use for the non-soil we fill our containers with. 'Non' because you will not use any garden soil. You want a bagged product containing materials like milled peat moss, perlite and/or vermiculite, and compost or "composted forest products". Do not attempt a 'Miracle' by using a bagged mix containing chemical fertilizers like Osmocote or Miracle-Gro, although organic mixes containing natural plant foods like worm castings are great.
• Step One: fill your containers with the medium and place them in water for an hour or until they become heavy and saturated.
• Step Two: Place them on something like a cookie tray that has a small lip all around to contain excess water.
• Step Three: Place the saturated containers on the cookie sheet and place two seeds in each 'cell'. Not one and not six; two seeds. Mark the containers well so that you'll know which tomato is which a month from now. Unless they're all dead and then it won't make any difference.
• Step four: Stretch Saran Wrap or a similar product over top of the whole schmageggie.
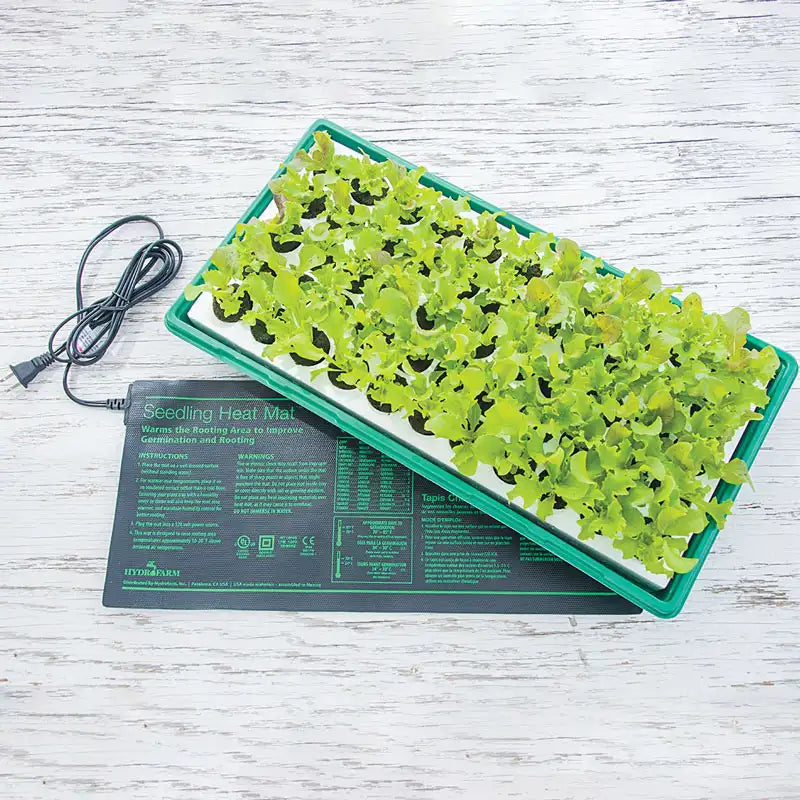
• Step Five: Bottom heat. Your seeds should germinate well if your set up is in the warmest part of the house. If you have the clearance, on top of the fridge (where the warm air rises up from the compressor) is ideal. Do not put your set up on a windowsill, radiator or other foolish idea. They don't need light yet and they prefer that their fruit be cooked, not the seeds.
• Step Five (a): Professional heating mats are a great investment if you want to do this right. They provide just the right amount of gentle, continuous bottom heat.
• Step Six: Inspect your plants-to-be-daily. You want to see moisture beaded up on the inside of the Saran Wrap. If you don't, add water to the pan; NOT from above.
• Step Seven: When you see the very first sprouts appear, remove all the plastic and any extra sources of bottom heat. From here on in, its light, light, light!
• Light: "Sunny windowsill": is Latin for "your plants look like a tall but underfed basketball player!". That windowsill won't provide enough hours of light and it's likely cold as heck at night. BUT if you have a true solarium that gets an intense amount of light, go for it. But if your plants begin to look "leggy" (tall and thin) give it up and use artificial light.
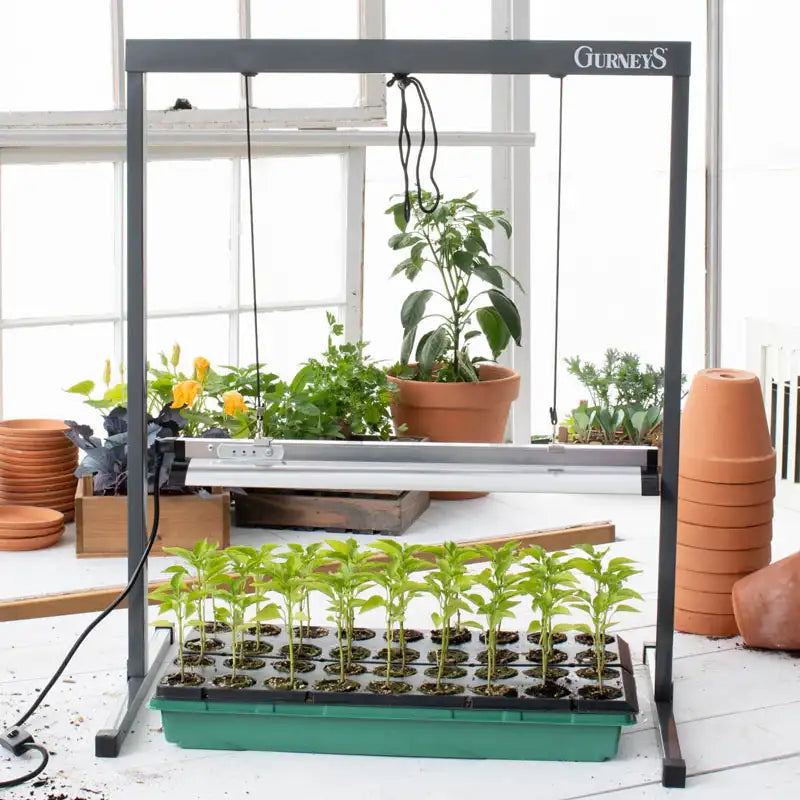
• Artificial Light: Easy peasy. If you're only starting a few six packs, get a standard shop light; two four-foot long florescent tubes and set it up. You can use the chains that come with such lights to raise it as your plants grow taller, but I prefer to put the cookie sheet up on a pile of books and remove the books as necessary. Either way, the tops of your plants should never be more than an inch away from the tubes. Fluorescent light is cold, so its better to have the plants growing into the tubes than to be too far away.
• Options: My 'shop lights' have FOUR four-foot long florescent tubes, so I can raise more plants and still give them plenty of lumens (NOT lupins). I recently saw LEDs used in the same type of fixtures and they are excellent; much brighter, much longer lasting and super-cool looking. Yes, they cost more; but like that hair color ad, "you're worth it". And so are your baby plants.
• Moving forward: Cut back on the water and keep the plants close to the tubes. If both seeds sprout, cut off the weakest looking one with a pair of scissors. (Yes; you have to!) About three to four weeks after emergence, feed your babies with a dilute liquid organic fertilizer. Repeat every two weeks afterward.
• Timing: You should start your seeds about two months before your typical planting date. Where I live, that's somewhere between May 15th and June 1st. so I typically start setting things up when the Philadelphia Flower Show closes. No matter what, do not plant your plants outside until nighttime temps are reliably in the nifty fifties.
• Extra Innings: If you want to start something early, do pepper plants; they're slow to grow and wouldn't mind an extra two weeks. They will still be small at planting time, but your tomatoes will not be; they will be tall and begging to go outside. And they can go out on sunny days; just bring them back inside on nights that dip below 50 until its safe to plant them.
A. OK; all seriousness aside, let's walk through the task of seed starting:
• Containers: Forget old egg cartons, yogurt cups and the like. Use the six-pack plastic containers (or four-pack or whatever) that garden centers and nurseries use. They're the right height and shape and have excellent drainage. Just rinse old ones out with soap and water; no need for dangerous chemicals that were once used as a deadly World War I trench gas.
• "Medium". Not the Fortune Teller who predicts when your starts will die, 'medium' is the term we use for the non-soil we fill our containers with. 'Non' because you will not use any garden soil. You want a bagged product containing materials like milled peat moss, perlite and/or vermiculite, and compost or "composted forest products". Do not attempt a 'Miracle' by using a bagged mix containing chemical fertilizers like Osmocote or Miracle-Gro, although organic mixes containing natural plant foods like worm castings are great.
• Step One: fill your containers with the medium and place them in water for an hour or until they become heavy and saturated.
• Step Two: Place them on something like a cookie tray that has a small lip all around to contain excess water.
• Step Three: Place the saturated containers on the cookie sheet and place two seeds in each 'cell'. Not one and not six; two seeds. Mark the containers well so that you'll know which tomato is which a month from now. Unless they're all dead and then it won't make any difference.
• Step four: Stretch Saran Wrap or a similar product over top of the whole schmageggie.
• Step Five: Bottom heat. Your seeds should germinate well if your set up is in the warmest part of the house. If you have the clearance, on top of the fridge (where the warm air rises up from the compressor) is ideal. Do not put your set up on a windowsill, radiator or other foolish idea. They don't need light yet and they prefer that their fruit be cooked, not the seeds.
• Step Five (a): Professional heating mats are a great investment if you want to do this right. They provide just the right amount of gentle, continuous bottom heat.
• Step Six: Inspect your plants-to-be-daily. You want to see moisture beaded up on the inside of the Saran Wrap. If you don't, add water to the pan; NOT from above.
• Step Seven: When you see the very first sprouts appear, remove all the plastic and any extra sources of bottom heat. From here on in, its light, light, light!
• Light: "Sunny windowsill": is Latin for "your plants look like a tall but underfed basketball player!". That windowsill won't provide enough hours of light and it's likely cold as heck at night. BUT if you have a true solarium that gets an intense amount of light, go for it. But if your plants begin to look "leggy" (tall and thin) give it up and use artificial light.
• Artificial Light: Easy peasy. If you're only starting a few six packs, get a standard shop light; two four-foot long florescent tubes and set it up. You can use the chains that come with such lights to raise it as your plants grow taller, but I prefer to put the cookie sheet up on a pile of books and remove the books as necessary. Either way, the tops of your plants should never be more than an inch away from the tubes. Fluorescent light is cold, so its better to have the plants growing into the tubes than to be too far away.
• Options: My 'shop lights' have FOUR four-foot long florescent tubes, so I can raise more plants and still give them plenty of lumens (NOT lupins). I recently saw LEDs used in the same type of fixtures and they are excellent; much brighter, much longer lasting and super-cool looking. Yes, they cost more; but like that hair color ad, "you're worth it". And so are your baby plants.
• Moving forward: Cut back on the water and keep the plants close to the tubes. If both seeds sprout, cut off the weakest looking one with a pair of scissors. (Yes; you have to!) About three to four weeks after emergence, feed your babies with a dilute liquid organic fertilizer. Repeat every two weeks afterward.
• Timing: You should start your seeds about two months before your typical planting date. Where I live, that's somewhere between May 15th and June 1st. so I typically start setting things up when the Philadelphia Flower Show closes. No matter what, do not plant your plants outside until nighttime temps are reliably in the nifty fifties.
• Extra Innings: If you want to start something early, do pepper plants; they're slow to grow and wouldn't mind an extra two weeks. They will still be small at planting time, but your tomatoes will not be; they will be tall and begging to go outside. And they can go out on sunny days; just bring them back inside on nights that dip below 50 until its safe to plant them.