Growing garlic
Listen to the Episode!
June 12th, 2026
Everything you need to know to store great garlic and grow great garlic this fall! (Reminder: get your orders in soon; garlic tends to sell out fast!)

A. Well, this is a very timely question as the garlic that many of us planted last fall will need to be harvested {quote} “soon”. That’s going to be a progression of dates starting in the South and ending up in Northern places like Minnesota around the middle of July. I’ll get to some helpful harvesting tips in a bit…
As if reading my mind, Penn State Master Gardener Dennis O’Donnel JUST posted a photo of a garlic plant with a thick central stalk that curls around and has a big, pronounced bulge near the top. He writes: “My garlic has started doing this. I've been cutting them off because I thought they were bolting. Should I?”
Absolutely! Those bulges (properly called scapes) are a sure sign that harvesting time is close. You should carefully inspect your plants and cut any scapes off immediately. In the future, you should not let those bulges grow large; cut them off as soon as the bulges are visible, otherwise they WILL ‘go to seed’ (which is no fun) and you’ll get smaller heads when you harvest.
Cut when young, garlic scapes are a true delicacy, especially in stir fries, where they add a subtle hint of garlic to the dish. But the scapes get tough if allowed to remain on the plant too long; not to mention draining energy from the growing bulb underneath. If you miss them entirely, they’ll explode and shower the area with seeds that will grow into annoying patches of garlic grass (like onion grass).
So hit pause on your player NOW, go out and check your plants! Here in Southeastern PA, we’ve been removing small scapes for a week now. (Note: soft neck garlic, which we will discuss later on, does not produce scapes.
The appearance of scapes means that harvest time is three to four weeks away, so begin checking your plants every day. The bottom leaves will begin to slowly turn brown soon, which is a good thing. (Note: If a plant is already all brown and skinny, carefully pull it out and trash it [do not compost it]; it has neck rot or some other problem and you want to remove it from the herd as soon as possible.)
Now comes The Art of Garlic: You want to harvest when the majority of your plants’ leaves are brown at the bottom third of the plant (which in my SE PA garden is generally right around the Fourth of July). The plants will not all achieve that level of brown leaves at the same time, which is good.
Don’t rush the harvest; you’ve got a good two-week window here. When you think the time has come, locate the plant that has the most brown, but don’t pull it if the bottom third isn’t fully brown, no matter how much you want to. Wait.
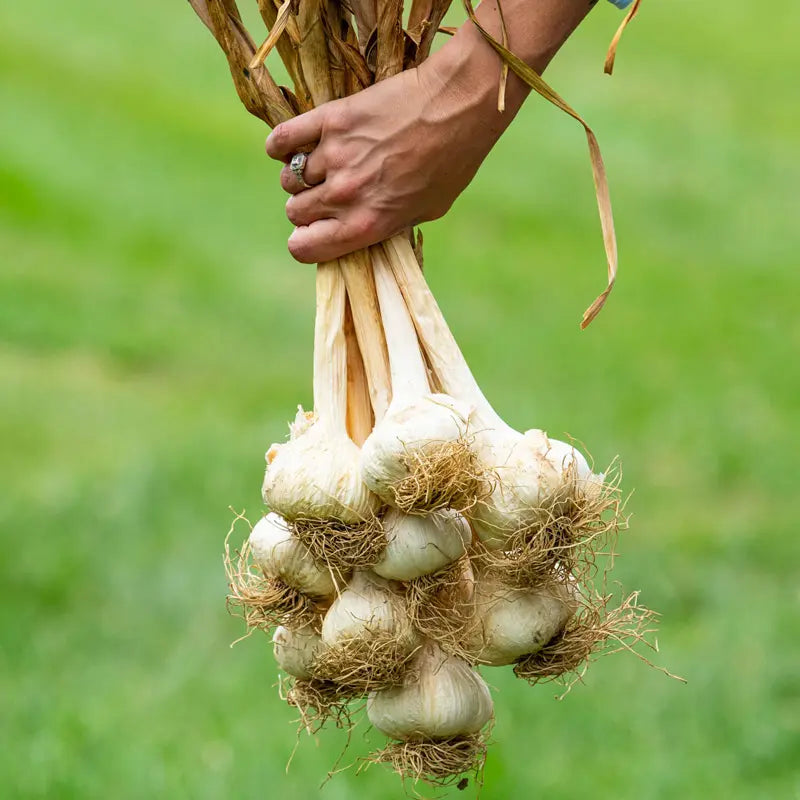
When that bottom third is fully brown, grab the stalk firmly at ground level and pull sloooowly. If it doesn’t budge, use your (gloved) hands to move some dirt away from the top of the bulb until it comes out with a tug. Don’t use a trowel; you could injure the bulb. Examine your catch. Is the bulb nice and big and covered with a white paper wrapper? It’s ripe. If the bulb is kind of smallish and the wrapper isn’t complete, use those cloves to season a dinner, but don’t pull any more. Test again a week later.
Prepare the curing area. Get the harvested garlic out of the sun and into a cool shady spot with good air circulation as soon as possible. I cure mine on a big table on my screened porch under a ceiling fan. You can use a regular fan. Either way, turn the plants regularly for a week or ten days. After that, you can gently brush dirt off the plants but do NOT wash them. They should be kept cool and dry at all times.
When you finally have to move them (the longer the curing period the better), trim off the stalk, which should be dry and straw-like by now. If it isn’t, keep turning and curing until it is. When the time comes, remove all but three or four inches of the stalk and trim the roots down to a couple of inches. Bring the bulbs inside and examine them carefully.
Put the biggest, best-looking bulbs aside for replanting stock; and if you grew enough, for gift giving. (I average 150 heads a season, so I can give great holiday gifts early.) Now comes the best part: Carefully sort through the rest and put any small or damaged heads aside for immediate use.
Place the big ones you saved for replanting into netted bags (like onions come in) and store them at around 60 degrees, preferably in the dark. NO PLASTIC BAGS!! If you want to hang them on a wall, make sure it never receives direct sun.
As listener Lisa (remember Lisa?) has described, take a bunch of the rest and carefully separate the cloves from inside the bulb. If any are heavily damaged (meaning discolored), toss or compost them. If a clove has a little bit of brown or yellow, just cut that part off. Then peel off the skins and cut them into corn kernel sized chucks. Place these immediately into a food dryer/dehydrator, dry them until they are bone dry and store them in tightly lidded glass jars into which you have added a bunch of the desiccating packets that come packed with sneakers, vitamins and such.
(Collect these packets--and spice jars with shaker lids--all season long; you’ll never have too many; store the packets in clean glass jars with tight lids.)
Then look at what you got left and sort them again, worst to best for cooking over the next month, always reserving the best-looking, tightest bulbs. And yes, save them in bulb form until it’s time to use them.
Figure out what you’ll need for replanting. With most varieties, you should get four to six cloves per bulb, so get a rough count from the perfect bulbs you originally set aside. Now—do you want a year’s supply of fresh garlic powder? If so, work backwards and take the skins off more of your in-between crop, chop and dry. No problem if you find that you saved more big cloves than you can plant, just peel, chop and dehydrate the extras to make more powder.
The dried garlic chunks you saved? As soon as you run out of fresh, take some chunks, run them through a dedicated coffee grinder (that has never been used for coffee) or similar device and pour the garlic powder into a clean dry spice jar with a shaker insert with a few of those desiccating pouches and use that perfect powder to cook and flavor. When it starts to run low, do another batch, just like fresh ground coffee.
Planting of the best cloves should begin in late August (NOT the old advice of waiting till November), preferably in a bed where garlic did not grow this year. Gently break the bulbs apart and separate the cloves—but do NOT peel them. Plant four to six inches deep (the colder your winters, the deeper) and six inches apart in your loosest most compost-rich soil, preferably with lots of added perlite for drainage. Greenery may appear this season or in the Spring; doesn’t matter.
Save the leftovers for fresh cooking, gifting or just plain bragging. (As bulbs, not cloves.) Hardneck bulbs should last a good three months before sprouting; and when they do develop green sprouts, break the bulbs apart and plant their sprouted cloves!
And to finally answer poor Lisa directly, some types of hard neck garlic store longer than others, with Porcelain varieties keeping for up to eight months.
In general, properly cured hardneck garlic stores for 3 to 6 months. Shorter-storing varieties (like Rocamboles) only last 3 to 4 months. Properly cured long-storing types (like Porcelains) can last up to 8 months under perfect conditions. (Or so says my source, John Boy Farms.)
So, if you want fresh garlic longer, research types and varieties carefully and plant some longer storing types. And/or try a run of softnecks, which store exceptionally well, don’t scape and are bred for warmer regions. I, however, will always be a hardneck.
