Gardens Alive! & Supplies


How to Start Vegetable Seeds Indoors
Nothing brightens late winter and early spring days like tomato, pepper or cabbage seedlings emerging from potting soil indoors. For many gardeners, starting vegetable seeds indoors is the official kick-off for gardening season.
Starting vegetable seeds indoors is easier than you might think&mdashand it's common when growing vegetables like tomatoes, peppers, eggplant, broccoli, Brussels sprouts and cabbage. Watchng seeds germinate and grow into green plants is a joy to watch.
Why Start Vegetable Seeds Indoors?
While many vegetables, such as lettuce, beans, peas and corn, will grow just fine and produce bountiful harvests from seeds planted directly in the ground, some need a head start, especially in areas with short growing seasons.
Vegetables like tomatoes, peppers and eggplant need warm ground to grow and produce bountiful harvests. The common practice is to start the seed indoors and transplant these plants into the garden once the soil warms.
Gardeners can either buy vegetable plants from mail-order nurseries or local stories—or grow their own vegetable plants from seed. Growing vegetables from seed offers many advantages, including:
- A better selection. More vegetable seed varieties are available than started vegetable plants.
- Cost savings. It's usually more economical to start vegetable plants from seed than to buy vegetable plants.
- Greater yields. Plants that get a head-start indoors, especially those with long growing seasons, usually produce greater yields before cooler fall weather sets in.
- It's fun. Watching tiny green plants emerge is a delight--especially on cold, gray days.
When to Start Vegetable Seeds Indoors
Starting vegetable seeds indoors requires a bit of planning. Ideally, your seedlings will be the right size at the ideal time to transplant them into the garden. Here's how to determine when to start vegetable seeds indoors:
- Determine what vegetables to start indoors. Vegetables that are usually started indoors include warm-season vegetables like tomatoes, peppers and eggplant, and cole crops such as cabbage, broccoli and Brussels sprouts. Some vegetables don't transplant well and are best directly sown into the ground. These include vine crops such as cucumbers, pumpkins, melon and squash, and root crops that don't like to be disturbed, such as carrots and beets.
- Read instructions on your seed packet. Some vegetable seeds should be sown 8 weeks before transplant while others are sown 4 weeks before transplant.
- Determine when you want to plant your vegetable plants in the garden. Tender vegetables, such as tomatoes and peppers, should not be transplanted to the garden until after the last spring frost date for your area. Because cole crops, such as cabbage and broccoli, can withstand a bit cooler weather, they can be transplanted a few weeks before tender vegetables.
- Consult your local extension service. Many local extension services have detailed planting calendars for specific areas.
Starting Vegetable Seeds Indoors in 8 Steps
Starting vegetable seeds indoors can be done in 8 easy steps. Below are the general steps to follow to successfully start sowing your seeds indoors.
- Read the information on the seed packet. It will tell you when to start your seeds and what they need in the way of soil and air temperature, humidity, and light, as well as any special pre-planting treatment.
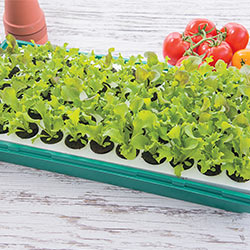
- Start vegetable seeds in a flat or a seed starting tray with holes in the bottom for drainage, such as Gurney's Seed Starting Tray.
- Fill the tray to about 1 1/4 inches from the top with a sterile growing medium made especially for starting seeds, such as Garden Solutions® First Start™ Seed Starter. Put the filled tray in a larger pan and add water to about halfway up the sides of the flat. Let the flat stand overnight to moisten the soil.
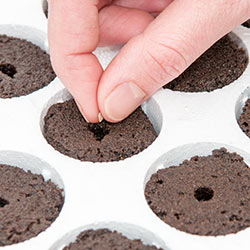
- Press the seeds into the planting mix to the depth recommended on the seed packet. Water with a misting spray bottle or with a fine overhead spray from a watering can. Keep the growing medium evenly moist, but never waterlogged.
- Ensure sufficient humidity by placing a thin pane of glass on top of the flat, and keep it in a spot where you can provide the soil and air temperatures and the amount of light recommended on your seed packet.
- Make up for any deficiency of sunlight by placing fluorescent light above the flat. Keep the lights on around the clock until the seeds germinate.
- Watch for signs of germination: The first thing you'll see will be a set of what appear to be small leaves. These are actually food storage cells called cotyledons. (Germination times vary greatly; again, your seed packet will tell you when to expect the first signs of life.) Continue to water so that the soil stays evenly moist. When the next set of true leaves appear, thin the seedlings to the spacing recommended on the seed packet.
- Choose the smallest and weakest-looking seedlings, pull them out gently so you don't disturb the remaining plants, and add them to the compost pile. Begin to feed the plants once a week with a good fertilizer, such as Garden Solutions® Vegetable Food.
Seed Starting Supplies
When starting seeds indoors, make sure you have the seed-starting supplies you'll need. Most gardeners order their supplies when they buy vegetable seeds.
Here are list of supplies to consider:- Seedling trays with cells, drip tray and cover: These are super-easy and convenient to use--and they help get your seedlings off to a good start. The cover helps hold in warmth and moisture.
- Seed starting mix: Using starting mix, instead of garden soil, helps control disease and get the seedlings off to a strong start.
- Seedling heat mat: Helps warm the soil temperature and speeds up germination.
- Transplant pots: Peat pots make ideal homes for transplanted seedlings, because at planting time you set the pot itself into the soil, thus avoiding damage to delicate roots. Another option are Grow Tub Transplant Pots, which can be used for multiple years.
- Artificial light: When starting seeds indoors, seedlings need between 12 and 16 hours of sunlight per day to grow. That means grow lights are often needed. Place containers on windowsills or below windows. Place your artificial light about 1-3 inches above seedlings for the first few weeks, then raise to 4-6 inches until transplant time.
How to Transplant Seedlings
After seeds germinate, the next steps include transplanting the seedlings to individual pots and then hardening them off before transplanting them into the garden. Here are more detailed steps:
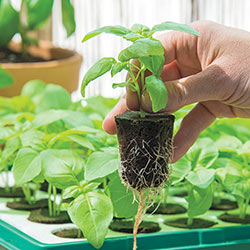
- Transplant the seedlings to individual pots filled with potting soil when you see two or three sets of leaves. Just before transplanting, water the seedlings, then gently lift them out with a spoon or a miniature trowel.
- Set each seedling into its pot, carefully firming the soil around the roots. Water gently but well, and continue feeding until it's time to harden off the plants and move them to the garden.
- About 7-10 days before transplanting to the garden, harden off the plants, or slowly introduce them to the outside elements, including temperatures, light and wind.
- Start by moving the plants where they are out of the wind and in dappled sunlight. Each day give them more and more sunlight, until they are used to being in direct sunlight all day. Make sure the soil stays moist throughout the hardening off period.
- Tender crops need more hardening off, or acclimation to the elements, than cole crops and other cool-season crops.
More Tips and Tricks
Here are some more tips on how to start vegetable seeds indoors:- Read your seed packets carefully. Some seeds need a period of chilling before you plant them; others need to be soaked in water overnight or scarified (nicked with a file or knife) to speed germination. Some seeds need light to germinate; others require total darkness.
- Rotate your seedling trays under a light source so that the seedlings do not get spindly.
- Mirrors or aluminum foil can be used to reflect sunlight or artificial light to give the seedlings the fullest benefit.
- Consider seed-starting with a fellow gardener and trading transplants. This is a great way to increase the variety of plants you can grow.
- Row covers can protect young plants from late-spring frosts. Many gardeners like to have covers and grow tunnels on hand.
- When selecting a space for seed starting, make sure it is big enough to accommodate transplants.